CAROUSEL ANIMAL CONSTRUCTION HANDBOOK
[PREVIOUS] [CONTENTS] [NEXT]
Details & Decorations (gold etc. leaf, opalescent
washes, glazing recipe)
Gold leafing is tricky, practicing on non-critical
areas, such as something other than your animal, before doing your animal's show side highlights. A
Venetian red under coat is often put on first, or you can just leaf directly
over the white primer. I like to put on the leaf first, before the color coats, as you can
smooth out the edges later with the paint if necessary. While leafing, if there
is any moist or wet paint in the area, any loose leaf flying to
that spot will stick to it quite well. Wet paint near leafing work is highly undesirable, be
sure large areas surrounding the area to be leafed are bone dry or covered.
GLAZING MIXTURE: Venetian Glaze (this is a furniture restorer's secret
formula)
- Colors (universal tinting colors, raw umber, burnt
umber, raw sienna, burnt sienna, yellow ochre, lamp black plus
any others needed such as green etc, you decide on the proportions and colors.)
- 2/3 Boiled Linseed Oil
- 1/3 Spar Varnish
- Dash of Whiting (diatomatious earth)
- Sprinkle of Liquid Cobalt Drier (1 cap full per
pint)
To make this mixture: mix all of above 3 to 1 part with mineral spirits
(in other words, this equals 2 parts boiled linseed oil + 1 part Spar varnish
+ 1 part mineral spirits + the other stuff)
For wiping the glaze off you will need a few packs of 100% cotton cheese cloth.
Optional:
- Wide Streaking Brush
- Vapor Mask
- Shellac (add whiting to dull)
- 0000 Steel Wool (to rub out if necessary)
- Paste Wax (Mrs. Caldwell's Antique Wax, corruba wax
etc.)
Stained Glass Jewels: First, the seating hole of appropriate
size must be drilled in the location with a flat bottomed drill bit such as
a Forstner bit. It's usually best to do this after the painting
as the hole must be clean for the glue to hold, and otherwise you might need to mask off each jewel or be very careful not to paint them. Use multi-purpose
glass and ceramic adhesive found at hardware stores to affix the jewels, I like
"Goop".
Stenciling

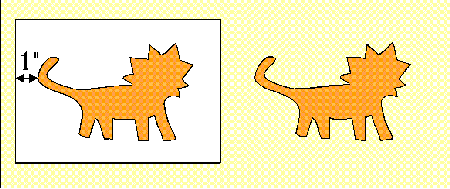
This is a basic single silhouette type stencil
sample.

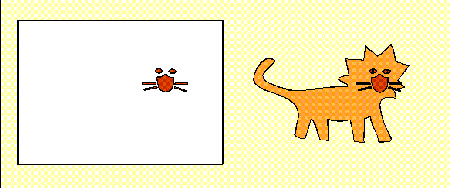
This shows a second part. To make additional parts of different colors on your stencil use
separate stencil boards.


Have several sizes of flat tipped stencil brushes on hand. Use masking
tape to secure stencil
while pouncing brush when necessary, it's like a little clamp, your friend.
Making and putting on stencils.
- Draw a simple design on to the paper board (some boards are better than
others, special stencil board is made, also Mylar sheets are used, these are
difficult to cut). Keep your drawing at least 1" from the edge of the board. This
keeps strength in the stencil and helps with neatness. Round curves are more difficult to cut than slight curves
or straight lines. Thin cuts do not stencil well unless you use a very fine
brush.
- Place the finished cut stencil board down on the area to be stenciled. Be careful not to interfere with any other freshly painted, wet stencils in the immediate area, you don't want to smudge them.
- While stenciling, hold down stencil carefully with two fingers so that it won't move around,
or better yet, use masking tape, although, when I am really doing a lot of
stenciling I hold with one hand pounce with the other and keep moving along from
one area to the next, this is fast. With the other hand hold the stencil brush perpendicular to the surface you are painting and pounce down with it.
Usually it is better to do the middle first and then the edges, this will assure that the brush is not too wet when doing the critical edges.
- Be sure to use a dry brush (have a cotton rag nearby for drying) otherwise wet paint might leak under the edges of the stencil board causing a sloppy print.
The same color coat gloss latex house paints work well for this job.
- When done, pull the stencil off straight up, this is easier done if one corner is held down fast with a finger while lifting. Now let it dry out.
- You can use both sides of a stencil in order to get mirror images. Just be sure that the painted side which is going down on to the animal is
completely dry, otherwise it will stick.
- You can use multiple colors to stencil on one stencil, this is best done by having a
separate brush for each color. Do it while the job is wet.
- It is also possible to paint freehand on top of the stencil with a fine brush.
- Wash out your brushes with water when done and store.
Materials needed:
- Stencil board (or Mylar).
- Stencil brushes.
- Mat knife.
- Cutting table.
- Latex paint.
[PREVIOUS] [CONTENTS] [NEXT]
Copyright © 1997-2002 by Dentzel Carousel Company


