
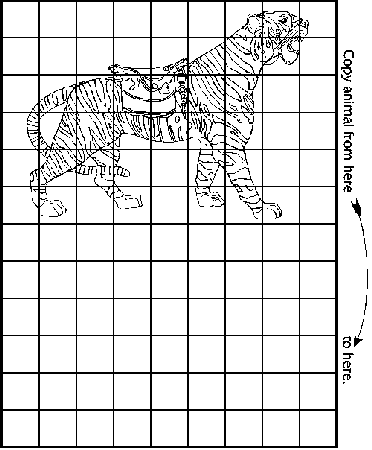
Grid and scale
It is important to know how to take a side view drawing or photo and scale it up to the size you want. Making your own sketch with the elements you like is good for advanced carvers and persons with sufficient drawing experience. Taking an existing drawing or photo and using that as your design is better if you are starting out. The drawing, photo, or sketch only has to fit onto a regular sheet of 8½" x 11" paper. On that a grid is then drawn onto the figure to scale it up. Be aware that what might appear to be a small or medium animal on full scale drawing you make becomes considerably larger when it is rendered into its full three dimensional, 8 to 12 inch wide form. Also, what might have appeared to be an acceptable shape or line in the small scale could change into something in need of adjustment when rendered at full scale. When this happens you must readjust the lines so the design flows properly, just smooth them out by sketching with a pencil on the uncut full scale cardboard template.
The process is basic: get the drawing or photo of the animal onto the standard sheet of paper, draw in the grid at uniform spacings (i.e. ½", this varies as you get more skilled at this and adjust the spacing on the small drawing according to how big of a piece you want to make, smaller spacings will generally give you a larger animal as you are dividing it up into more pieces so to speak). On a sheet of cardboard or similar stiff board large enough for your full scale animal, draw out another grid at even intervals which will give you the full size you want, This can vary too, it is a way of adjusting the size of your animal as to how close together the lines of the grid are. Now the fun begins, just find the matching points from the small grid to the large grid, sketch in the lines square by square, eventually you'll be able to do larger sections in one sweep. You are in control of the scale-up by how far apart the grid lines are, the larger the grid, the larger your animal will be. I often use 6" on center (o.c.) lines, that comes out to 1 inch of my coloringbook drawing equals 1 foot of the actual carving IF I COORDINATE THE GRID'S SCALE RELATIONSHIP, you can try that and see what it looks like and then do one at 5" or 4" o.c. and see what happens, with familiarity you'll see the simplicity of all of this.
Time spent experimenting with the template is very well spent, cardboard is much cheaper and quicker to work with than wood. Depending on the use of your design you might need to pay special attention to the floor line so that the hooves (or paws) are all standing on the same plane, adjust accordingly. Set your full scale template vertically and check it by looking at it from a distance.
Now you must decide where to separate the various pieces and parts of your figure. Further on in this handbook you will see drawings of the individual parts and it will be easier to understand where it is best to separate things after getting a better understanding of the pieces you'll be making. This is where the second template comes in handy. I cut one template up at the joints leaving the other template whole.
 |
|
|